Hey Guys! I thought I’d show you what i made my Friend for Christmas. It was really affordable and when gifts are handmade it makes them a little more personal. I made her a (Drum Roll)… A Ring-Bracelet Combo! Literally addicted to them currently, since I made one for myself over summer. I wear them to Uni sometimes and always get comments on how special they look. My friend is into unusual and interesting rings quite heavily so I thought what better than another one to add to her collection. I know she’s been taking a fancy to mine, I can tell! Or maybe she was just distracted as I always fiddle and play with my jewellery when I’ve got new things on!
I bought an eye catching ring to base the piece on. Because this is the centre piece of the item, its important to get something snazzy. It’s probably the most expensive piece of the whole thing. And rings are inexpensive themselves anyway. The chain is from a broken, heavily reduced necklace. It had a large plastic musical not on, so now I’ve got a spare one on those which is what I’ve always wanted! I always pick up the bargain necklaces so I have lots of spare chains.
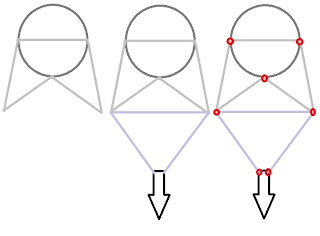
I started by working out the wrist size and cut the chain with jewellery pliers. Its important to keep the clasp on, as otherwise you’ll make more work for your self trying to re-attach it. But the clasp will usually fit into any of the other metal loops so it’s O.K to cut them off. If you measure around the wrist with the clasp effectively being “1” then that is the start of your wrist measurement. Give a little extra length so the jewellery is slightly loose. Otherwise the wearer will struggle to do anything practical when wearing it! Then I made the bottom 2 triangles attaching the spare chain halfway around the circle on one side. Then produced a zig-zag shape and attached the 3rd join at the other side of the wrist.
The dark circle is the wrist measurement of chain and the pale grey lines are the zig-zag shape you’ve created. Much easier in these little drawings so step 2 results in this shape. The ring is displayed by the arrow. So the lilac lines are pieces of chain which attach the ring to the bracelet part. A new lilac triangle is created by attaching the chain to join the top points of your first triangles and leading them up to the ring. The ring I chose has holes in it which makes it easy to attach jump rings and the chain. The third drawing shows the red circles as being the jump rings so you can work out how many you need and where they go.
 This was how I wrapped it up. Pretty fiddly because I didn’t want it to get all tangled up before she unwrapped it!


